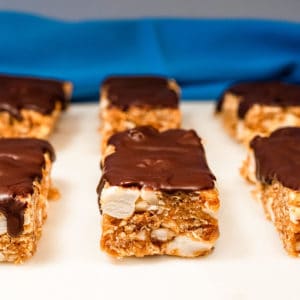
Peanut Butter S'mores Bars (Gluten-Free)
Just a few simple ingredients to ooey-gooey, peanut buttery, chocolatey, marshmallowy, s'mores heaven! This recipe for Peanut Butter S'mores Bars takes the traditional s'more adds some peanut butter, oats, and dates to transform it into a yummy, no-bake, tasty treat.
Servings: 10 Bars
Ingredients
- 1 cup medjool dates, pitted (1 cup packed)
- 1 cup old fashioned oats
- 1 ½ cup rice crisp cereal
- ½ cup unsalted roasted peanuts, chopped
- ⅓ cup peanut butter, no sugar added
- 3 tablespoon agave or maple syrup
- 1½ cup vegan marshmallows
- ½ cup vegan chocolate chips or chunks
- ½ teaspoon coconut oil
Instructions
- This step is optional. Spread the oats out onto a sheet pan and toast them at 350 degree fahrenheit for about 10 minutes just until slightly brown. This will produce a toasty flavor, but isn't necessary for the recipe. You can use raw oats.
- Pulse the dates in a food processor until they resemble a dough. The dates need to be good and gooey. If your dates are dry then soak them in very hot water for about 10-15 minutes before doing this step.
- If your peanut butter is nice and creamy you can skip warming it up. But if your peanut butter is not soft then combine it with the agave and warm on low heat in a small saucepan or the microwave. Just remember to do this at a low heat. Then set aside.
- Put the oats, rice cereal, and chopped peanuts into a large bowl. Mix together.
- Add the peanut butter and agave mixture along with the date dough mixture to the bowl with the oats, rice, and chopped peanuts. Now mix it all together with your hands or a spoon to incorporate well. Now add the vegan marshmallows and work them in.
- Once the mixture is good and combined, place it in an 8x8 square pan lined with parchment paper. Press the mixture down into the pan to level it out. Try to get it as flat and packed in as you can. If you aren’t using a nonstick pan you will definitely want to line it with parchment paper. Now place the pan in the freezer so that the mixture gets cold and firms up.
- Melt the chocolate by combining it with the ½ teaspoon of coconut oil in a double boiler. Then heat it at a low temperature until fully melted.You can also melt the chocolate in the microwave in a microwave safe bowl. Heat in the microwave at the very lowest setting for 30 seconds. If the chocolate is still not melted heat again for another 10 seconds at the very lowest setting and so forth until the chocolate is fully melted. You want to make sure not to heat the chocolate too quickly or it will burn.
- Once the mixture is good and cold turn the pan over onto a cutting board to pop out the 8x8 square of yummy goodness. Now, cut into 10 bars.
- To coat the bars with chocolate, place them on a cooling rack. Now place that cooling rack with them on it over a sheet pan lined with wax or parchment paper. Pour 1-2 teaspoon of melted chocolate over each bar to fully coat. Place the bars in the fridge for the chocolate to set.
- Store the bars in the fridge for up to a week or in the freezer for up to 3 months. I remove the bars from the fridge about 15 minutes before eating. They can also be stored at room temperature for a few days, but I find that they keep much better when kept cold.
Notes
*If you are allergic to peanuts, any nut butter can be substituted in this recipe.
*To store in the freezer, you will want to place wax or parchment paper in between each bar to prevent them from freezing together in one big clump.
Nutrition
Calories: 266kcal | Carbohydrates: 38.9g | Protein: 6.7g | Fat: 11.1g | Saturated Fat: 2.6g | Sodium: 80mg | Potassium: 57mg | Fiber: 3.3g | Sugar: 25.6g
Tried this recipe?Mention me on Instagram @dances_with_knives and add the hashtag #danceswithknives! Would love to see your yummy creations!